Tuesday, September 8, 2009

my next assignment

So the assignment for this week is a maximum depth picture...

(one is which everything is in focus & taken with a wider lens)


taken on Brumbaugh's Fruit Farm in Arcanum, Oh. Site of the yearly Mills Family Reunion, the perfect place to host 8 boys, ages 9 & under, plus a couple girls thrown in for good measure....


And a minimum depth picture (one which only the object in the foreground is in focus)


taken in my backyard, after I explained to my husband that he needed to build a fire, just so I could take this picture. I had to drink the cider too (oh, the suffering for my art!)


These two assignments were a bit easier, since it was more focused. On Thursday we will critique the pictures from last week, which I am really looking forward to- I feel like I need more feedback.

Wednesday, September 2, 2009

so....which picture is your favorite??

I am in the beginning of my photography class, which I am very excited about (and nervous...I won't even get into the vocabulary lists & midterms!) The first assignment was to take 36 pictures to print & turn in....then pick our favorite to have graded. I can't decide...so I have narrowed it down to a few....tell me what you think....by tomorrow night!

Thanks!


Tuesday, June 9, 2009

long time, no blog


So with the move, end of the school year & all the birthdays, I haven't been feeling too creative lately...but I have been inspired a bit by having the new, neutral space to decorate. I just want something that feels more like us. Anyway, this is Colin's bathroom (I'll get to the bathroom layout later). The lightning isn't very good (it is 10:30pm as I am finishing this!) But I painted the bathroom a light green, kind of bright color. For the dots I used self adhesive vinyl. It was so great & easy to work with! (even Jason helped!)
I found this patterned vinyl that had 2 shades of green, navy blue & orange & I matched the solid color vinyls to that pattern.
To complete the bathroom, I bought solid color towels in navy & orange (which made us look like Bears fans, which we are not!), a solid navy rug, clear toothbrush holder & cup & a white plastic trashcan. I used the rest of the vinyl dots to put some color on the toothbrush holder & trashcan.


More about the bathrooms...the new house has 4 1/2. The girls share one, Colin has his own, the master, the guest bath on the main floor & then the 1/2 on the main floor. I have painted the guest bath (its just yellow, not exciting, not even really sure I like it). The 1/2 bath is green stripes & as soon as the mirror & picture get hung, I will take pictures. Hopefully, I am going to start on the girls bath later this week. I have no idea when I will get to the master bath. First, I need to figure out what I am doing...I am starting to think I need to subscribe to a home decorating magazine, this is so out of my realm!
Any ideas?? send them my way!
-Jenni

Wednesday, March 18, 2009

disney outfits


This started out as basic pillowcase-inspired dresses. http://www.jenleheny.com/pillowcase-dress-instructions
Then I decided I needed to add something to the shorts underneath. So, I went to the Once-upon-someone-else's-child store & bought the girls jeans to alter. The older one, I decided was maybe too old for ruffles, so I took the hem band instructions from this tutorial http://houseonhillroad.typepad.com/photos/twirly_skirt/
and put them on her shorts.

I must have measured the little one wrong, because when I sent to put it on her, not only was it too small around the tummy, it was too short as well. I didn't have enough fabric to start all over, so I added same materials panels to the sides & then the contrasting hem band (also from the above tutorial). I almost like it better with the side panels, I think it hangs better, although you can't really tell from these pics.


These are the twirly skirts I made (tutorial linked above) I really liked them & once I made the first one, it was pretty easy to do. For the shirts I appliqued a Mickey head on the Old Navy tee. I think it turned out pretty cute.
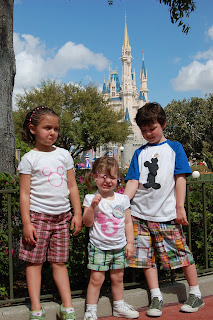


(don't ask me about their faces- I have no idea) These shirts were really easy to do....got the idea from Susan's blog
http://chaosensued.blogspot.com/ I just cut the shape I wanted out of contact paper with my trusty Cricut & then painted. Sunday was A's birthday, so she got the Mickey head with a 3 (can't tell too well from this picture). C's turned out cute- its hard with an almost 8 yr old to know what he will think is okay & what he won't.
I have my last (for awhile anyway) rag quilt on the machine & I am trying to finish that up before summer!

Saturday, February 28, 2009

I made a trashcan!!!

So, I have had the material to do this for quite awhile. I used my cricut cutter & vinyl http://www.cricut.com/ and my sure cuts alot software http://www.craftedge.com/index.html and a Star Wars font I already had on my computer (yeah, a little geeky I know. But I have a 7 yr old boy in LOVE with Star Wars! What are you going to do???)

All I had to do was cut the vinyl to mat size, hook up my laptop to the cricut & figure out what I wanted to cut. It was really easy & now I am trying to figure out what else to cut! I need some white vinyl so I can decorate my laptop!


Thursday, February 12, 2009

More rag quilts

This is A's quilt. She LOVES nemo, so when I saw this flannel- I had to get it & make her a quilt. I couldn't find the right shade of green flannel, so I had to use a fleece. It posed a few problems, mainly the thickness under the sewing foot, but all in all it worked out okay.


This is E's quilt. She LOVES Hannah Montana...so I got this for her. I used the fleece for her as well. I think they turned out well- I love these owls!


Happy Valentines Day!!!

So, I got this idea from my friend Susans (check out her blog http://chaosensued.blogspot.com/ )
sister in laws blog (since I don't really know her, I don't think I should link her blog)
Anyway, this shirt was for E to wear to her Valentines party today. Its a good thing she goes in the afternoon, since I just started it this morning. But it was pretty easy. I drew the heart shape, cut it out & then fit the long sleeve tee under it. Using embroiery thread, (and my rusty hand sewing skills) I stitched around the heart.
Then I decided I wanted the backs of the shirts to also be sewn together. So, I wrote what I wanted and then stitched the lines using embroidery thread again.
All & all, I think it just took a few hours to get it all done.


Since we are heading out on the Disney cruise in March, I have a few projects in the works for the kids to wear. And I have another rag quilt in process......